
SDVoE Solutions
Yamaha has been a member of the SDVoE Alliance® since June 2022. Incorporating SDVoE contributes to the realization of highly reliable and cost-effective solutions for the corporate Pro AV/IT industry, which requires both high-quality video and audio infrastructure.
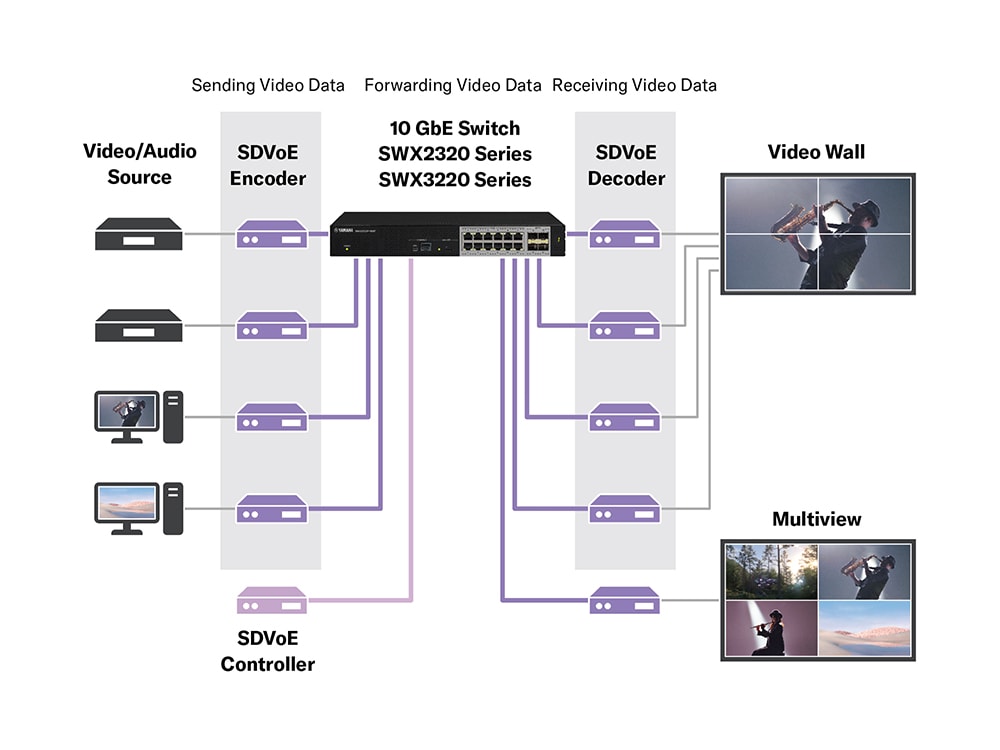
What is SDVoE?
SDVoE (Software Defined Video over Ethernet) is an international standard for the professional audio/video (ProAV) market that can transmit 4K high-definition video and audio over 10 Gigabit communications.
By combining SDVoE encoders/decoders and controllers with a 10 Gigabit switch, video walls and multi-view systems can be configured.
This provides flexible support for implementations of digital signage across a variety of facilities, including airports, schools, e-sports facilities, and corporations.
Switches
SDVoE is supported by the following 10-Gigabit switches.
-
SWX3220-16TMs
L3 Switch Network Switches
L3 Standard switch with 16 ports
-
SWX3220-16MT
L3 Switch Network Switches
L3 Standard switch with 16 ports
-
SWX2322P-16MT
L2 Switch Network Switches
L2 Intelligent PoE++ switch with 16 ports
-
SWX2320-16MT
L2 Switch Network Switches
L2 Intelligent switch with 16 ports
Setup
Use the following 4-step procedure for Yamaha 10-Gigabit switches in SDVoE environments.
Step 1
Prepare a microSD card.
Use a microSD card, which makes it easy to apply the latest firmware and optimal settings for SDVoE.
Step 2
Store the latest firmware and SDVoE configuration file on the microSD. card.
Insert the microSD card into the PC that will be used for the setup.
1. Download the latest firmware for the switch from the Download tab on the product page.
2. Download the SDVoE configuration file here.
3. Create the following folders on the microSD card, and store the latest firmware in the "firmware" folder. Then, save the SDVoE configuration file in the "startup-config" folder.

The SDVoE configuration file includes the following two settings:
1. IGMP Snooping settings (version specification, fast leave settings, querier settings)
2. Discarding multicast frames not registered in FDB
*1 swx2320, swx2322p or swx3220 depending on the switch you use
*2 Store the latest downloaded firmware file
*3 Stores the downloaded SDVoE configuration file
Step 3
Insert the microSD card into the switch and turn on the switch.
Insert the microSD card into the microSD slot of the switch, then turn on the switch. The switch will start up with the firmware and apply the SDVoE configuration. Please note that it takes approximately 60 seconds for the switch to start up.
Step 4
Apply the latest firmware and SDVoE seettings from the microSD card to the switch.
If the switch is always turned on with the microSD card inserted, this step is not necessary.
Maintenance Tips
To use the switch without a microSD card that contains the latest firmware and SDVoE configuration file, use the following procedure to copy and apply the firmware and confirutation file from the microSD card to the flash memory of the switch.
1. Access the switch from a PC used for configuration.
Refer to the technical documentation "Technical Data" for the product (SWX3220, SWX2320/SWX2322P) on how to gain access from a PC.
2. Save the running-config of the switch to startup-config. For information on how to save running-config, refer to [Maintenance and operation functions] - [Config management] - [5.2 Save running config] in the technical documentation.
3. Update the switch using the latest firmware on the microSD card. For information on how to update the firmware, refer to [Maintenance and operation functions] - [Firmware update] - [5.3 Using an SD card to update the firmware] in the technical documentation.
For easier installation, the SDVoE optimization settings page can be accessed from the switch's web GUI.